
How to Replace Himore Pressure Washer Outlet Valve Manifold [Photos]
Replacing your pressure washer outlet valve manifold might sound like a tall order. At the very least, it’s a whole lot of words.
However, this project is one that you can complete yourself, and we’ll help you out.
Follow these easy step-by-step instructions to complete the installation. Are you a visual learner, or maybe just new to pressure washer pumps? We've got you covered. See the bottom of the page for pictures corresponding to each step.
Since The ROP Shop’s outlet valve manifold is equipped with a new unloader valve and outlet tube, you won’t need to remove yours for installation, so you may be able to go directly to Step 5. However, if you do ever need to replace either of these parts, the following instructions will still be helpful.
Here are the SKUs for replacement parts that you might find handy along with associated models. The Verify Fitment widget on our product listings can also help you to check compatibility.
Replacement outlet valve manifold SKU - 101355
Replacement unloader valve SKU - 100940
Replacement outlet tube fitting SKU - 101354
Associated models - 308653003, 308653025, 308653052, 308653007, 308653045, 308653006, 308418003, 308418007, APW25/2.3L, PWV25/2.3, PWV(R)27/2.3
Pressure washer outlet valve manifold replacement instructions
STEP 1: Collect the needed tools:
- Mallet
- Crescent wrench
- Allen wrench
- Flathead screwdriver or small pry bar
STEP 2: Use your flathead screwdriver to take out the pin (also known as the U-clip) that secures the loader in place.
STEP 3: Leverage your screwdriver against the manifold casing to remove the unloader.
STEP 4: Using your crescent wrench, remove the outlet tube fitting.
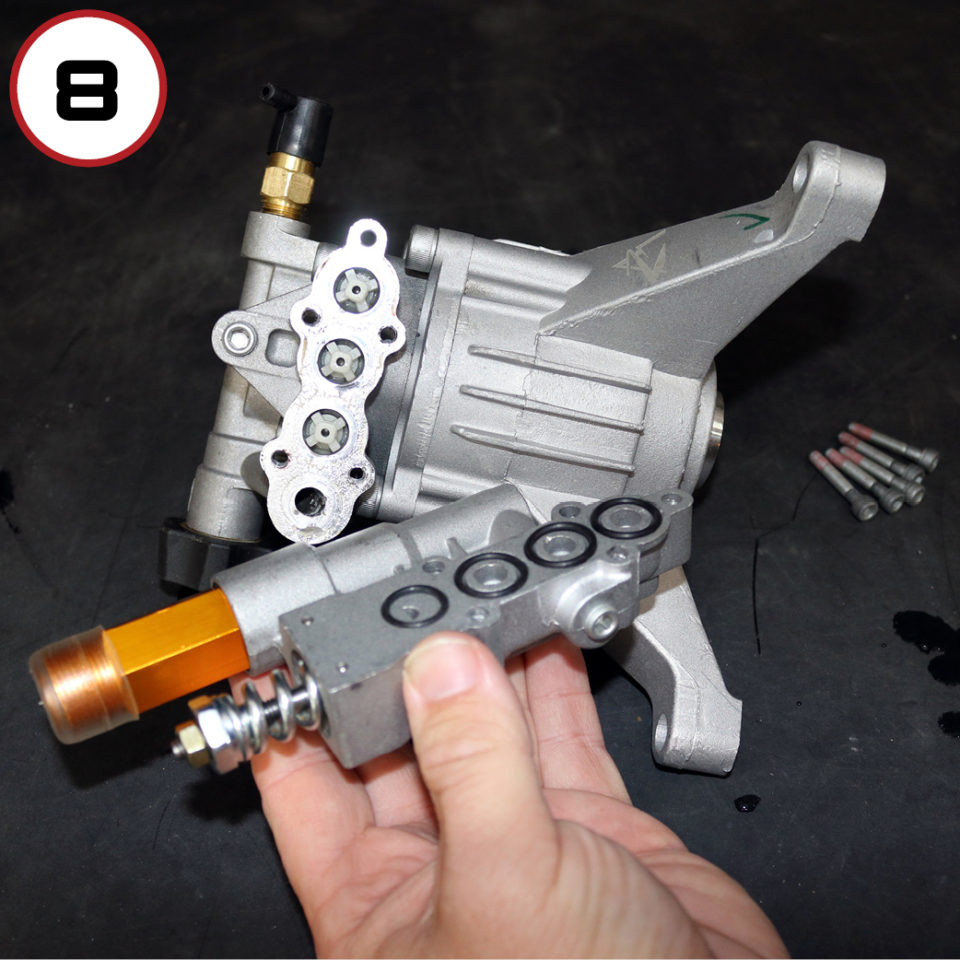
STEP 5: Use a 4mm Allen wrench to remove the bolts holding the manifold in place. Take care to place the bolts somewhere safe so you don’t lose them.
STEP 6: Once the bolts have been removed, you should be able to take off the manifold easily. When you do so, you should see four groups of O-rings.
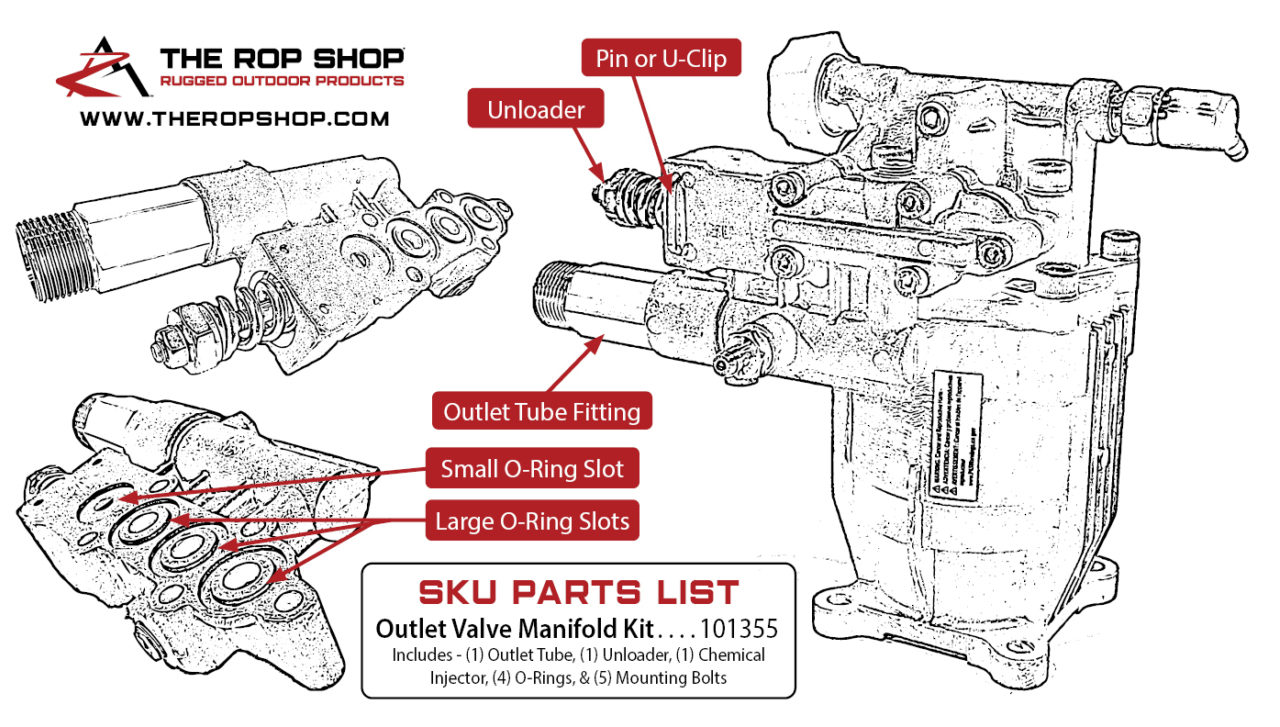
STEP 7: If you’re using The ROP Shop’s O-ring seal kit, you’ll notice that one of the four rings is smaller than the rest. Place the smallest ring in the spot nearest the unloader port and the rest in the other open spaces.
STEP 8: As you replace the O-rings, ensure that they don’t fall out of the grooves or become pinched between the manifold. If this happens, a watertight seal cannot form, and you may experience a loss of pressure or a leak. In this case, the O-ring will be ruined, and you will have to replace it again.
STEP 9: Once the manifold is in place, put the bolts in, turning them by hand until the manifold is tight against the pump. Then continue tightening with an Allen wrench. However, be sure not to overtighten them. If you do, you risk breaking the bolt heads off or stripping the aluminum threads within the pump wall.
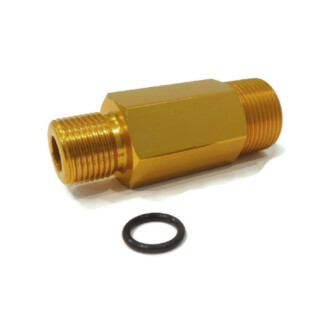

STEP 10: Grease the O-rings at the base of the unloader and outlet tube. This will help to protect against catches or tears when you’re putting them back into the manifold. Then you can tighten the outlet tube into place using your crescent wrench. Since there’s an O-ring at the base to stop leaks, don’t overtighten it.
STEP 11: Make sure that the unloader is fully seated in the manifold so that you will be able to reinstall the U clip. You may have to tap it gently with a mallet to get it into the correct position.
STEP 12: When you’re satisfied with the position of the unloader, reinstall the U-clip to hold it in place.
With your manifold replacement complete, it’s time to test it out. Make sure you only test the unit while water is running through the system.
Wrapping up
We hope this guide was helpful as you replace your pressure washer’s outlet valve manifold.
If you need other resources to help you with your pressure washer, we’ve got your back. Check out our Rugged U blogs on pressure washers. We also have some videos covering pressure washers that you can watch.
[EDITED 3/2023]


Article basis: https://www.youtube.com/watch?v=fLXSA8nPFCs

Having trouble using your ROP Shop pressure washer surface cleaner? These tips can help you out.

Thinking about getting a pressure washer? Here are eight advantages to owning a pressure washer to help convince you.

Installing a new pressure washer pump doesn’t have to be a hassle. Let The ROP Shop walk you through it.

Ready to learn how to pressure wash quickly, effectively, and safely? Check out these eleven tips.