
How to Replace Your Pressure Washer Pump [Remove + Install]
No one likes it, but sometimes your pressure washer pump goes gently into that good night, and it’s up to you to remedy the problem. But that’s a lot easier said than done when your new pump arrives and you’re staring at the shipping box, wondering what to do now.
Fortunately for you, The ROP Shop’s got your back with our guide to removing and replacing your pressure washer pump. Follow along so you can get back to pressure washing.
Getting a replacement pressure washer pump
If you don’t already have a replacement pump for your pressure washer, you can check out our guide to finding the right pump for your unit.
Once you’re ready, you can follow along with the steps laid out in this blog to install your replacement pressure washer pump.
We also have a video on this topic that you can consult if you need some visual cues. You can find our video on installing a pressure washer pump here or at the bottom of the page.

Replacing your pressure washer pump
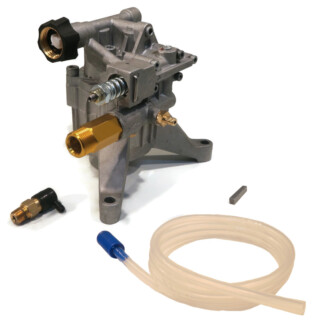
Note that in the rest of this blog's instructions, as well as in our video, we use the example of replacing the pressure washer pump on a vertical engine (or under-mounted unit). However, installation for horizontal engines is very similar and can actually be easier. Horizontal engines (or side-mounted units) like you see in the image here tend to be easier to access and work on.
Tools needed
- Correct size wrench for pump’s bolts
- Allen wrench (if your unit has a set screw)
- Loctite anti-seize
- Loctite threadlocker (blue)
Removing your old pressure washer pump
1. Disconnect the spark plug wire on your pressure washer.
You may need to pull on the recoil start cable a few times during the installation. Therefore, it’s a good idea to disconnect the spark plug so that the motor doesn’t start while you’re working.
2. Set the washer in a secure location.
You want it somewhere where it won’t move so that you won’t damage the unit or yourself in the process.
If you have an under-mounted pressure washer, you won’t want to lay it on its back, so you’ll need to remove and reinstall your new pump with your washer in the upright position.
However, if you do need to lay it on its back, be aware of where the oil will pool as you’re working. You want to avoid leakage as much as possible.
3. Remove the bolts attaching the pump to the motor and pull the pump off of the engine shaft.
If you can’t get the pump to come off after removing the bolts, don’t take a sledgehammer to it just yet.
In some cases, there may be an additional set screw securing the pump to the engine shaft. If so, it will also need to be removed to detach the pump. This is most common on 7/8” shafts that originally had a strap-style pump installed.

To gain access to the set screw, locate the open access area near the shaft of the pump. As you gently and slowly pull the recoil start cable, the shaft inside the access opening will spin, and you will eventually see the set screw move into view.
Using the correct size Allen wrench, remove the set screw. If the set screw falls into the housing when you attempt to pull it out, you will be able to retrieve it when you pull the pump off.
The bolts and set screw are the only parts holding the pump on. If you find it difficult to slide the pump off, it may be corroded in the shaft allowance.
If you still struggle to remove the pump after removing the bolts and possible set screw, there are other options. Some pumps have threaded holes on the base of the existing pump that can be used to separate the pump from the shaft.
Finally, although it’s always best to try to remove the pump by hand instead of using a tool that could damage your pressure washer, you may eventually need to use a pry bar to pull off the pump.
Be careful of the shaft as you remove the pump and retrieve the set screw if it happened to fall inside of the pump housing.
Installing your new pressure washer pump
1. Get the keyway in line.
For your vertically mounted pump, use the recoil cable to move the keyway slot to face you.
If you have a horizontal engine shaft, carefully pull the recoil start cable until the groove where the keyway sits is facing upward. This will make it easier to line the pump up and will help keep the keyway from simply falling out during installation.
2. Dry-fit your pump without the keyway.
Slide your pump all the way onto the engine shaft and then check each leg of the pump. If there’s any gap at all between the pump and your engine block, or if there is a metal ring between your engine block and the bolt hole that hits the bottom of the pump’s flange, you’re going to need spacers.
If you try to over-tighten your bolts instead of using spacers, then the pump, your engine shaft, and pump legs could become damaged or broken.
Bottom line: use spacers if you think they are needed. Be sure to use the same thickness and quantity of spacers for each bolt tab.


3. Prepare the keyway.
If you need to replace your keyway and your replacement pump doesn’t come with one, you can purchase a new pressure washer keyway from our website.
Once you’ve figured out whether you need spacers, you’ll pull the pump back off of the shaft and insert the keyway into its slot on the shaft. This can be a new keyway, or you can clean and reuse your old one if it’s still in good condition.
You’ll also want to clean off the shaft with a rag with a cleaning solvent sprayed on it. Do not spray the solvent directly onto the shaft. There’s an oil seal that could be damaged by the cleaning chemical.
After sliding the keyway in, apply anti-seize to the shaft and keyway. This will help to hold the keyway in place.
Alternatively, you can put a small dent in one side of your keyway before pushing it on to your engine shaft. This will help the keyway wedge into place and prevent it from falling out.
Do not use any kind of glue or adhesives to attach the keyway to the shaft.
Do NOT install your pump without a keyway. This will cause the shaft to spin freely or to catch sporadically in the pump allowance. The pump will not function and could become damaged.
4. Prepare the pump for installation.
Start by lining your pump up to the bolt holes. If your pump has four bolts, make sure the water inlet and outlet are facing the direction you want them to. Ensure the keyway slot inside the pump is facing you, just like on the shaft.
You should be able to spin the pump shaft allowance by hand to get it to point in the direction you need. However, if you need help to turn the slot, you can do so with a wrench or other tool. Be very careful not to damage the keyway slot.

5. Slide the new pump onto the shaft.
On a horizontally mounted pump, it’s easier to set the keyway on the shaft while you’re marrying the pump to it.
With a vertically mounted pump, you’ll have to align the keyway while holding the pump in place as you affix the pump to the shaft.
Line up the pump with the shaft and carefully slide the pump on. It can be difficult to line up the keyway slot on the pump with the keyway on the shaft. You may find that the keyway will move if you’re not aligned correctly. This might take a few tries.
6. Check your work.
Carefully pull the recoil start cable. Do this to determine if there’s any binding between the engine and the pump.
7. Tighten parts down.
If you didn’t see any binding between the engine and the pump, you can now use your wrench to tighten down the bolts. To ensure the pump is tightened down evenly, follow the same practice you would for a car tire. After tightening one bolt, tighten the bolt on the opposite side of the pump next.
You have the option of using a threadlocker liquid on the thread of the bolts to help protect the bolts from working loose due to vibration. Using threadlocker blue liquid will allow you to remove the bolts again in the future with minimal effort.
Be sure to reinstall the set screw as well if your pump has one.
8. Do final tests.
Reinstall the spark plug cable before testing your unit. Additionally, be sure to hook up your pressure washer to a water source before testing. Running your pump without water can destroy your bearings.


Conclusion
We hope this guide has helped you to get your pressure washer back in tip-top shape. If you’re still having difficulty removing or installing your pressure washer pump, try watching our video where we demonstrate these steps for you.
If you’re still in need of replacement pressure washer parts, go ahead and look through our selection. We carry a variety of pressure washer parts, from pumps to hoses to nozzles and more. Plus, when you shop with The ROP Shop, you get free shipping to the Lower 48 States, competitive prices, and excellent customer service.
Finally, check out our Rugged U blogs and videos on a variety of pressure washer-related topics.

Having trouble using your ROP Shop pressure washer surface cleaner? These tips can help you out.

Thinking about getting a pressure washer? Here are eight advantages to owning a pressure washer to help convince you.

Ready to learn how to pressure wash quickly, effectively, and safely? Check out these eleven tips.

Don’t just throw your snowmobile into the shed when winter is over. Learn how to summerize it to prolong its life.