
Salt Application Basics to Help You Vanquish Snow & Ice
GOT SALT?
Ah, salt. It flavors our food, soothes our sore throats, and makes cured meats like bacon possible. As far as minerals go, it’s a pretty great one.
But unlike when it comes to, say, French fries, the question of how much (or which) salt to use for roads and parking lots in the winter doesn’t come down to personal preference.
If you want to use salt for snow and ice removal, there are a few things you’ll need to know to do it successfully. Fortunately, The ROP Shop is here to help. We’ll walk you through some of the basics of salt spreading so you can get going with your snow removal.
The short version of salt application
We recommend reading the article in full so you can learn all the tips and tricks, but here’s a brief summary to get you started. If you're short on time, feel free to bookmark this page for later, or you can jump directly to any sections that pique your interest using the links provided.
- The amount of salt you use depends on factors like your material and the weather; however, 2.3 lbs/1000 sq. ft. at 30°F is a typical starting point.
- Anti-icing is applying product beforehand (ideally a liquid), and it can be a quick and cost-effective way to approach snow removal.
- De-icing is applying product on top of snow and ice after most of it has been cleared away, and even though it takes more materials, it can help you achieve bare pavement.
- Getting high-quality spreaders and salt can save you time and money in the long run on your snow removal.
- You should calibrate your equipment to make sure you’re spreading the correct amount of salt.
HOW MUCH SALT SHOULD YOU USE?
If you spread salt professionally, you might be tempted to salt heavily just to make sure you completely cover an area. Or maybe you fall into the trap of trying to save your salt and wind up not treating an area properly.
Neither of those options are great, as the first can lead to waste and the second to unhappy clients. The key here is finding a balance so that you can get the most use of your materials while keeping your clients satisfied.
All of this means that the first step in your salt strategy should be determining how much salt you need to be using.
Unfortunately, there isn’t really a one-size-fits-all answer. For light snow or ice, 2.3 pounds or more of salt per 1000 square feet at a pavement temperature of 30°F should work (see chart below). However, factors like the weather conditions and what kind of salt you use will impact this number.

The colder it gets or the more snow that falls, the more salt is needed. A drastic drop in temperature or an increase in precipitation could quickly multiply the amount of salt you’ll need to distribute.
Plus, if you’re battling ice instead of snow, you’ll need even more salt (or possibly a different product altogether) to get the same job done.
The amount of salt you need to do a job well may also depend on what kind of steps you’ve taken beforehand. For example, if you plow a lot before salting it, you shouldn’t need to apply as much product since there’s less snow and ice on the pavement.
Therefore, if you’re wondering how you can use less salt for your salt spreading jobs, an obvious solution is to take advantage of your plow.
Anti-icing and De-icing
Are you pre-acting or reacting?
An important aspect of salt application strategy is anti-icing versus de-icing. Salt Smart Collaborative has a lengthy manual for snow removal in which anti-icing and de-icing are discussed. We’ll highlight some of their information here.
Anti-icing
Ever heard the saying “an ounce of prevention is worth a pound of cure”? That’s basically the philosophy behind anti-icing.
What is anti-icing, and how does it work?
Anti-icing is a proactive approach to snow and ice removal where you apply product to the pavement before snow and ice accumulate.
When you do this, you’ll prevent ice and compacted snow from bonding with the pavement and sticking there. This makes it significantly easier to remove with a shovel, plow, snowblower, or other mechanical method.
Anti-icing benefits
- It makes snow removal operations easier.
- It’s quick—a parking lot can potentially be treated within minutes.
- It can prevent your being called out to deal with light winter weather events.
- The effects can last for several days.
- It’s cost-efficient, requiring only about one-fourth the material of de-icing and costing one-tenth as much.
- Anti-icing is better for the environment; since it uses less material, it causes lower levels of water pollution.
Tips for anti-icing
- Use liquids, not solids, for anti-icing (they are more efficient, cause less damage, work faster, and stay in place better).
- Apply anti-icing chemicals only when snow or ice is predicted within the next 72 hours.
- Do not apply if the weather forecast calls for rain, as the product will simply wash away.
- If there is still salt residue on the pavement, do not apply anti-icing chemicals.
- Avoid over-applying—it can make the surface slippery.
- The amount of anti-icer you’ll want to apply varies, but a good starting point is around 15-30 gallons per acre for frost and 15-40 gallons per acre for light to moderate snow, assuming you’re working with a salt (NaCl) solution with a 23.3% concentration.
- Factors like the specific material used, pavement temperature, speed of application, and precipitation conditions can affect how much/how often you apply.
- Err on the side of restraint (see above note on over-applying).


De-icing
Let's turn our attention to the other end of the spectrum with de-icing.
What is de-icing, and how does it work?
De-icing is a reactive snow and ice removal approach where you treat the pavement after snow and ice are already on it.
When you apply a de-icer, it will work from the top of the snow (or ice) downwards to break the bond between the snow/ice and the pavement. This is meant to be done after the majority of snow and ice has already been removed.
Although it requires more material (and is therefore more costly) than anti-icing, it is still a helpful strategy if you’re trying to achieve bare pavement.
Tips for de-icing
- Don’t use de-icing as your first snow removal strategy; it should be used after most ice and snow has already been cleared.
- Apply enough de-icer to the pavement so that it can do its job of breaking the bonds, but remember that overapplication is bad for the environment, can harm infrastructure, and will waste money and time.
- Calibrating your equipment can help you use the right amount of product.
- Only apply de-icer where you need it, and keep in mind that foot and vehicle traffic will help to spread it out.
- For example, if you place salt in the middle of the sidewalk, that should be sufficient, as the salt will spread out to the edges as people walk on it.
- Don’t spread it where ice and snow haven’t accumulated.
- The pattern you use when you’re applying de-icer matters. Factors like foot and vehicle traffic and pavement conditions will impact where you lay down product (and how heavily you do so).
- Don’t spread de-icer where it would be up against a building, as it can cause damage.
- Consider using a drop spreader if you're de-icing a sidewalk.
- If you use spreader equipment, take it slow and be controlled.
- Pre-treated materials can help the de-icer to stay in place when you apply it since they will stick to the pavement.
- Bonus: you can make your own pre-treated materials to use during a snow event by adding small amounts of de-icing liquid (such as a salt brine, calcium chloride, magnesium chloride, or beet juice) to your dry material. Start with a baseline of 6-8 gallons of liquid per ton of dry material, and err on the side of using less. With the pre-treatment method, you will wind up using about 30% less material, and the de-icing process will work more quickly.
- Be sure to lower your application rate for pre-treated/pre-wetted product.
Calculating salt rates for parking lots and more
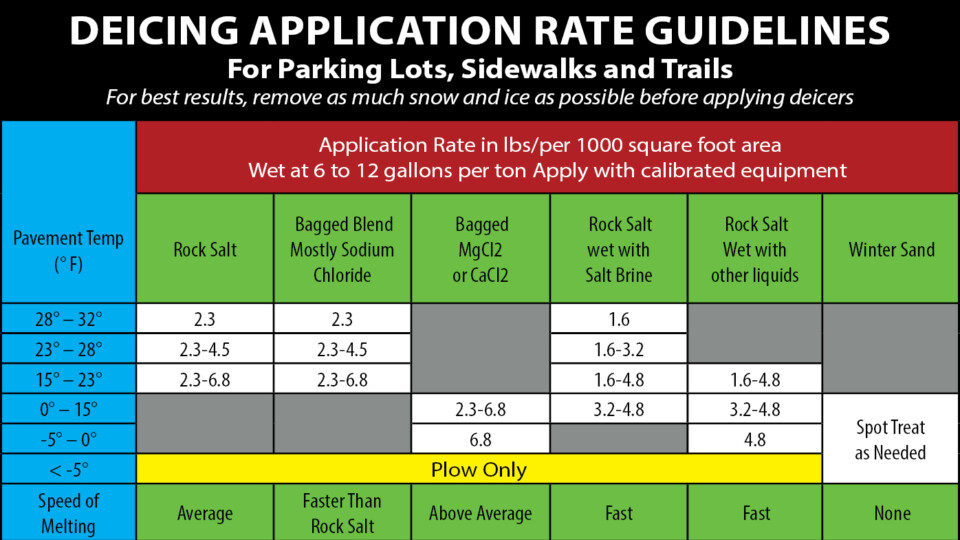
To figure out how much de-icer to use, check out this chart adapted from Wisconsin Salt Wise. However, keep in mind you’ll probably need to adjust the amount of de-icer you apply depending on the specific situation.
INVESTING IN YOUR EQUIPMENT
Now that we’ve discussed what and how much to spread, it’s time to tackle how you spread—aka your equipment.
Quality applicators tend to distribute the salt more uniformly, saving you time and materials. If you buy a cheap spreader, you might wind up spending the money you just saved on more salt removal products to compensate for poor equipment performance. Sometimes trying to be thrifty ends up costing you more in the long run.
However, just because the equipment is quality doesn’t mean it will stay new forever. When it’s time to purchase replacement parts, The ROP Shop is here to help with our quality selections and great prices. Since we’re based in the USA, we offer FREE standard shipping to anywhere in the lower 48 states. We also offer expedited options for those pesky unplanned mishaps. Be sure to check out our parts for snow removal equipment.
The lesson about quality applies to your salt and salt vendor as well. Purchase your salt or de-icing goods from a reputable vendor, and do your research beforehand. Who do your competitors use? Does the vendor come highly recommended? Do they know what they are talking about?
Anyone can sell salt. The trick is figuring out who you can trust to provide you with quality materials.
SALT SPREADER CALIBRATION RECOMMENDATIONS
So how can you make sure you’re applying exactly as much salt as you should be? The best practice for snow management companies is to employ a calibration process for their material spreaders.
We recommend that these calibrations take place before the start of the season and then two or more times during the season. You should also recalibrate whenever new equipment is installed or when a material change is made.
Below we’ve adapted a calibration chart and steps for calibrating your salt spreader from MSD Project Clear that you can print and use as needed.
Equipment Needed
- Scale to weight salt
- Salt collection device
- Marking device
- Watch with a second hand
Calibration Steps for Salt Spreaders
- Bypass, remove, or turn off the spinner.
- With the spreader system running, warm up the truck’s hydraulics to the normal operating temperature.
- Place a small load of salt in the truck.
- Mark the shaft end of the conveyor or auger.
- Dump the salt onto the auger.
- Increase the truck’s RPMs to working levels by revving the engine.
- For each control setting, count how many revolutions the shaft makes and record that number.
- Collect the salt that was displaced during one revolution, weigh it, and subtract your container weight. You can make this more accurate by collecting the salt from multiple revolutions, weighing, and dividing the the number on the scale by the number of revolutions to get an average weight.
- To calculate the discharge rate in pounds per mile, multiply your shaft RPM by discharge per revolution to get your discharge rate in pounds per minute. Then multiply your pounds per minute by the number of minutes it takes to travel one mile at varying truck speeds. See the printable form at the bottom of the page for help.
Automatic Controls Calibration
- Bypass, remove, or turn off the spinner.
- Set the control to a specific number.
- Secure a tarp or a bag beneath the spreader's discharge area.
- On a roadway or other paved surface, mark a measured distance, such as 100 or 1,000 feet.
- With the spreader operating, drive that distance.
- Weigh the salt that was discharged.
- Multiply the weight of the salt by 5.28 if you drove 1,000 feet or by 52.8 if you drove 100 feet. This will give you the amount of salt released per mile. This number will remain constant no matter the speed, although calibration will be required for each control setting. Some automated control manufacturers provide “simulators” that eliminate the requirement for calibration when you're on the road.
SALT AWAY
Now that you understand what goes into calculating salt amounts, anti-icing and de-icing, application rates, the importance of good equipment, and how to calibrate so that you spread the right amount, you know the basics of salt application.
Be sure to reach out to our customer service department if you have questions about your equipment.
You can also read our other blogs about snow removal, like our guide to selecting a salt spreader or our article about salt spreader maintenance.
Don't forget to come to The ROP Shop when it's time to get parts for your snow removal equipment.
[UPDATED 10/2023]

Having trouble using your ROP Shop pressure washer surface cleaner? These tips can help you out.

Thinking about getting a pressure washer? Here are eight advantages to owning a pressure washer to help convince you.

Installing a new pressure washer pump doesn’t have to be a hassle. Let The ROP Shop walk you through it.

Ready to learn how to pressure wash quickly, effectively, and safely? Check out these eleven tips.